穷人玩转AI大模型-Llama3微调流程
2024年4月18日,Meta发布了Llama-3模型,提供了8B和70B参数两种规模的版本。这些模型预先在大约15万亿个文本标记上进行了训练,这些文本标记来自“公开可用的资源”,并且在“公开可用的指令数据集以及超过1000万个人工注释的示例”上进行了指令模型的微调。Meta计划发布多模态模型、能够使用多种语言进行对话的模型,以及具有更大上下文窗口的模型。目前,一个拥有400B+参数的版本正在接受训练。
笔者在完成Llama2的微调[1]后继续微调Llama3。微调过程积累的经验记录在这篇文章,供需要的读者参考。
准备工作
在进行Llama3的微调之前,需要确保下面重要的准备工作(具体流程参考[1])已经完成:
- 获得Llama3大模型使用许可
- 注册Hugging Face账号并获得Access Token
- 注册Google Colab,并申请了付费计算资源服务(主要是谷歌服务器GPU的使用权)
Llama3的微调全程(包括大模型加载,大模型推断和大模型微调)在Colab上进行。Colab的硬件资源包括:
- 内存62.8GB
- 显存22.5GB(Nvidia L4 GPU)
- 硬盘78.2GB
软件包安装
使用下面命令在Python环境中安装需要的机器学习的常见库:
!pip install  datasets
!pip install accelerate
!pip install -U transformers
!pip install -i https://pypi.org/simple/ bitsandbytes
!pip install trl
!pip install peft
!pip install flash-attn --no-build-isolation
上面 pip 安装命令用于在 Python 环境中安装各种库,通常在 Jupyter Notebook 或 Google Colab 等环境中使用感叹号 ! 来在代码单元格内运行系统命令。下面是对每个命令的具体解释:
1.!pip install datasets
这条命令安装了 datasets 库,该库由 Hugging Face 提供,用于加载和处理公开的数据集,非常适合于自然语言处理和机器学习任务。它提供了快速、高效、易于使用的数据加载接口。
2.!pip install accelerate
安装 accelerate 库,这也是由 Hugging Face 开发的。accelerate 库用于简化在 CPU、GPU 或 TPU 上加速运行 PyTorch 代码的过程,使得跨不同硬件的代码执行更加容易和高效。
3.!pip install -U transformers
安装或更新 transformers 库到最新版本。transformers 是 Hugging Face 提供的另一个非常流行的库,包含了大量的预训练模型,主要用于自然语言处理任务,如文本分类、信息提取、问答系统等。
4.!pip install -i https://pypi.org/simple/ bitsandbytes
通过指定的 PyPI 索引链接安装 bitsandbytes 库。这通常用于安装一些在默认 PyPI 索引上可能不可用或需要特定版本的库。bitsandbytes 主要用于优化深度学习模型训练,通过提供高效的定制操作来减少内存消耗和提高性能。
5.!pip install trl
安装 trl(Transformer Reinforcement Learning)库,这个库通常用于实现基于变换器的强化学习方法,如使用 GPT 模型进行强化学习训练。
6.!pip install peft
安装 peft(Parameter-Efficient Fine Tuning)库,这个库包含了实现参数高效微调方法的工具和函数,有助于在有限资源条件下改进预训练模型的性能。
7.!pip install flash-attn --no-build-isolation
安装 flash-attn 库,该库提供了优化的注意力机制实现。使用 --no-build-isolation 选项可以在安装时避免构建隔离,这通常用于需要使用全局依赖而不是隔离环境中的依赖进行编译的场景。
下载Llama3
Colab可以和谷歌云盘(Google Drive)互联,因此笔者选择将Llama3下载存放在Google Drive里。Google Drive可以使用下面的命令挂载到路径’/content/drive’:
from google.colab import drive
drive.mount('/content/drive')
笔者使用了下面的代码下载大模型Llama3到路径/content/drive/MyDrive/Machine Learning/model_llama3:
# Log in using a personal access token from huggingface.co/settings/tokens
from huggingface_hub import login
login(token='hf_XXX')
import torch

from transformers import AutoTokenizer, AutoModelForCausalLM, pipeline

# Adjust according to your device capabilities
device = torch.device("cpu")
# device = torch.device("cuda")

# Load model directly
model_id = "meta-llama/Meta-Llama-3-8B"
tokenizer = AutoTokenizer.from_pretrained(model_id)
model = AutoModelForCausalLM.from_pretrained(
    model_id
).to(device)  # Ensure the model is on the correct device

# Save the model and tokenizer locally to Google Drive
model.save_pretrained('/content/drive/MyDrive/Machine Learning/model_llama3')
tokenizer.save_pretrained('/content/drive/MyDrive/Machine Learning/model_llama3')
Llama3推断
完整代码
笔者使用下面进行文本生成/模型推断。此代码利用了先进的量化技术和注意力机制实现,以优化模型在 GPU 上的性能。这使得模型能在较低的资源消耗下提供快速而准确的文本生成能力。
from transformers import AutoTokenizer, AutoModelForCausalLM, pipeline, BitsAndBytesConfig
import torch
# BitsAndBytesConfig int-4 config
bnb_config = BitsAndBytesConfig(
load_in_4bit=True,
bnb_4bit_quant_type="nf4",
bnb_4bit_compute_dtype=torch.bfloat16,
)
# Load the tokenizer and model from the fine-tuned model directory
model_path = "/content/drive/MyDrive/Machine Learning/model_llama3"
model = AutoModelForCausalLM.from_pretrained(
model_path,
device_map="auto", # if have GPU, then load the model to GPU
quantization_config=bnb_config,
attn_implementation="flash_attention_2"
)
tokenizer = AutoTokenizer.from_pretrained(model_path)
tokenizer.pad_token = tokenizer.bos_token # add a padding token
tokenizer.padding_side = 'left' # to prevent warnings
# List of test prompts to evaluate the model
test_prompts = [
"Tell me what you learnt from Wikitext-2 dataset",
"Did you remember I just fine-tuned you on Wikitext-2 dataset?"
]
# Generate text for each test prompt, use generate() instead of pipeline() for faster generation speed,
# see https://huggingface.co/docs/transformers/perf_infer_gpu_one?install=NVIDIA#flashattention-2 for more
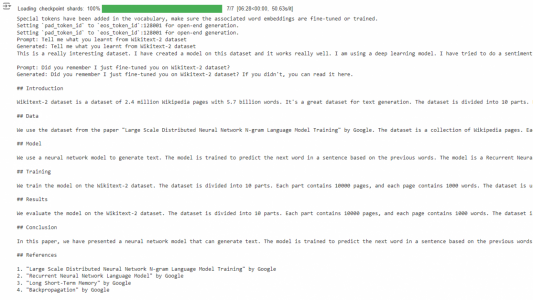
for prompt in test_prompts:
inputs = tokenizer(prompt, return_tensors="pt").to("cuda")
generated_ids = model.generate(**inputs)
outputs = tokenizer.batch_decode(generated_ids, skip_special_tokens=True)
print(f"Prompt: {prompt}\nGenerated: {outputs[0]['generated_text']}\n")在Colab运行的结果如下图所示:

代码分析
下面具体分析Llama3推断代码的功能。
导入库和配置量化
from transformers import AutoTokenizer, AutoModelForCausalLM, pipeline, BitsAndBytesConfig
import torch

# BitsAndBytesConfig int-4 config
bnb_config = BitsAndBytesConfig(
    load_in_4bit=True,
    bnb_4bit_quant_type="nf4",
    bnb_4bit_compute_dtype=torch.bfloat16,
)
这段代码首先从 transformers 包中导入了必要的模块和类。然后,定义了一个 BitsAndBytesConfig 对象,配置了模型的量化参数。这里设置模型以 4 位整数模式运行,使用了 nf4 量化类型和 torch.bfloat16 数据类型,以减少模型的内存使用和提高计算速度。
加载模型和分词器
model_path = "/content/drive/MyDrive/Machine Learning/model_llama3"

model = AutoModelForCausalLM.from_pretrained(
    model_path,
    device_map="auto",
    quantization_config=bnb_config,
    attn_implementation="flash_attention_2"
)

tokenizer = AutoTokenizer.from_pretrained(model_path)
tokenizer.pad_token = tokenizer.bos_token # add a padding token
tokenizer.padding_side = 'left' # to prevent warnings
这段代码加载了一个位于指定路径的预训练模型。通过 device_map="auto" 参数,模型会自动加载到可用的 GPU 上(如果有的话)。模型的注意力机制使用了 flash_attention_2,这是一种优化的注意力机制实现,可以进一步提高模型的推理速度。
分词器也从同一路径加载,并设置了填充标记为句子开始标记(bos_token),且填充方向设置为左侧,这通常用于避免在生成任务中出现格式警告。
生成文本
test_prompts = [
    "Tell me what you learnt from Wikitext-2 dataset",
    "Did you remember I just fine-tuned you on Wikitext-2 dataset?"
]

for prompt in test_prompts:
    inputs = tokenizer(prompt, return_tensors="pt").to("cuda")
    generated_ids = model.generate(**inputs)
    outputs = tokenizer.batch_decode(generated_ids, skip_special_tokens=True)
    print(f"Prompt: {prompt}\nGenerated: {outputs[0]['generated_text']}\n")
这一部分代码首先定义了两个测试用的提示语句,然后对每个提示语句进行处理。使用分词器将文本转换为模型可以理解的输入格式,并将输入移至 GPU(如果可用)。然后,使用 model.generate 方法生成响应的文本,并使用 tokenizer.batch_decode 方法将生成的 token ID 解码为可读的文本。
每次生成的文本会打印出来,以供查看模型的输出效果。
微调Llama3
完整代码
笔者在colab运行下面代码(主要涉及使用 Hugging Face Transformers 和其他库)微调 Llama3 模型:
import torch
from transformers import AutoTokenizer, AutoModelForCausalLM, BitsAndBytesConfig, TrainingArguments
from datasets import load_dataset
from trl import SFTTrainer
from peft import LoraConfig

dataset = load_dataset("wikitext", "wikitext-2-raw-v1", split="train")

# Hugging Face model id
model_id = "/content/drive/MyDrive/Machine Learning/model_llama3"


# BitsAndBytesConfig int-4 config
bnb_config = BitsAndBytesConfig(
    load_in_4bit=True,
    bnb_4bit_use_double_quant=True,
    bnb_4bit_quant_type="nf4",
    bnb_4bit_compute_dtype=torch.bfloat16,
    llm_int8_enable_fp32_cpu_offload=True
)

# Load model and tokenizer
model = AutoModelForCausalLM.from_pretrained(
    model_id,
    device_map={"": 0},
    attn_implementation="flash_attention_2",
    quantization_config=bnb_config
)
tokenizer = AutoTokenizer.from_pretrained(model_id)
tokenizer.pad_token = tokenizer.eos_token # add a padding token
tokenizer.padding_side = 'right' # to prevent warnings


# LoRA config based on QLoRA paper & Sebastian Raschka experiment
peft_config = LoraConfig(
        lora_alpha=128,
        lora_dropout=0.05,
        r=256,
        bias="none",
        target_modules="all-linear",
        task_type="CAUSAL_LM",
)


args = TrainingArguments(
    output_dir="/content/drive/MyDrive/Machine Learning/model_llama3_finetuned", # directory to save and repository id
    num_train_epochs=3,                     # number of training epochs
    per_device_train_batch_size=1,          # batch size per device during training
    gradient_accumulation_steps=2,          # number of steps before performing a backward/update pass
    gradient_checkpointing=True,            # use gradient checkpointing to save memory
    optim="adamw_torch_fused",              # use fused adamw optimizer
    logging_steps=10,                       # log every 10 steps
    save_strategy="epoch",                  # save checkpoint every epoch
    learning_rate=2e-4,                     # learning rate, based on QLoRA paper
    bf16=True,                              # use bfloat16 precision
    tf32=False,                              # use tf32 precision, my GPU does not support
    max_grad_norm=0.3,                      # max gradient norm based on QLoRA paper
    warmup_ratio=0.03,                      # warmup ratio based on QLoRA paper
    lr_scheduler_type="constant",           # use constant learning rate scheduler
    push_to_hub=False,                       # push model to hub
    report_to="tensorboard",                # report metrics to tensorboard
)


max_seq_length = 2048 # max sequence length for model and packing of the dataset

trainer = SFTTrainer(
    model=model,
    args=args,
    train_dataset=dataset,
    peft_config=peft_config,
    dataset_text_field="text",
    max_seq_length=max_seq_length,
    tokenizer=tokenizer,
    packing=True
)


# start training, the model will be automatically saved to the hub and the output directory
trainer.train()

# save model
trainer.save_model()


# free the memory again
del model
del trainer
torch.cuda.empty_cache()
在Colab运行的结果如下图所示:
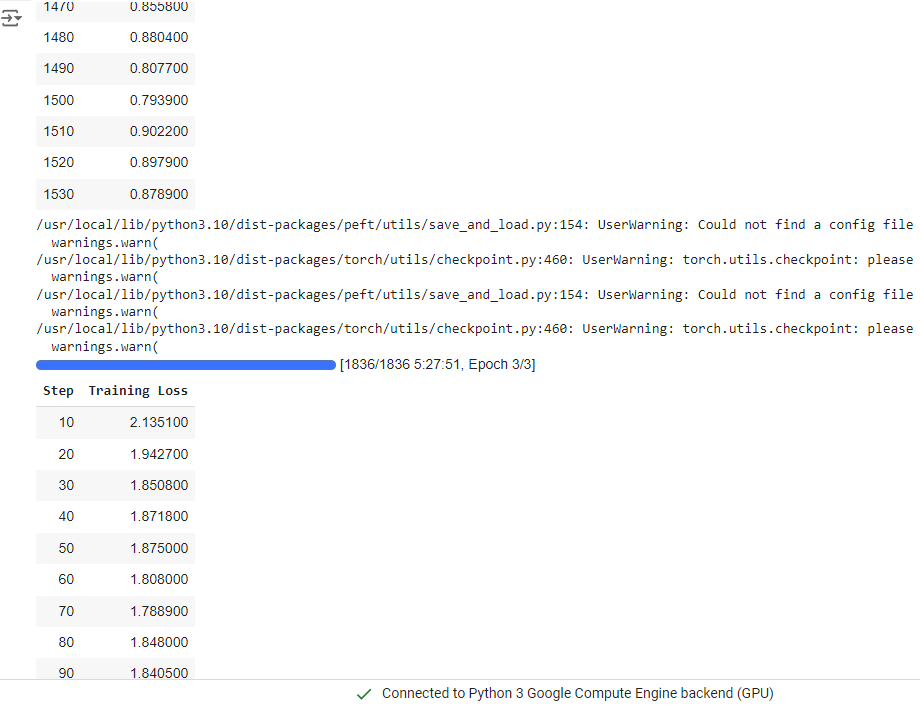
微调总共进行了3个epoch, 总耗时为10h2min。
代码分析
加载数据集
dataset = load_dataset("wikitext", "wikitext-2-raw-v1", split="train")- 加载 Wikitext-2 数据集的训练部分,这是一个公开的文本语料库,用于语言模型的训练和评估。
配置模型和分词器
model_id = "/content/drive/MyDrive/Machine Learning/model_llama3"

bnb_config = BitsAndBytesConfig(
    load_in_4bit=True,
    bnb_4bit_use_double_quant=True,
    bnb_4bit_quant_type="nf4",
    bnb_4bit_compute_dtype=torch.bfloat16,
    llm_int8_enable_fp32_cpu_offload=True
)

model = AutoModelForCausalLM.from_pretrained(
    model_id,
    device_map={"": 0},
    attn_implementation="flash_attention_2",
    quantization_config=bnb_config
)
tokenizer = AutoTokenizer.from_pretrained(model_id)
tokenizer.pad_token = tokenizer.eos_token
tokenizer.padding_side = 'right'
- 从指定路径加载预训练的模型和分词器。
- 配置模型的量化参数,使用 BitsAndBytes 库来降低模型的内存使用并提高计算速度。
- 设定模型加载到第一个 GPU 上,并指定了使用
flash_attention_2作为注意力机制的实现。
微调配置和训练
peft_config = LoraConfig(
    lora_alpha=128,
    lora_dropout=0.05,
    r=256,
    bias="none",
    target_modules="all-linear",
    task_type="CAUSAL_LM",
)

args = TrainingArguments(
    output_dir="/content/drive/MyDrive/Machine Learning/model_llama3_finetuned",
    num_train_epochs=3,
    per_device_train_batch_size=1,
    gradient_accumulation_steps=2,
    gradient_checkpointing=True,
    optim="adamw_torch_fused",
    logging_steps=10,
    save_strategy="epoch",
    learning_rate=2e-4,
    bf16=True,
    tf32=False,
    max_grad_norm=0.3,
    warmup_ratio=0.03,
    lr_scheduler_type="constant",
    push_to_hub=False,
    report_to="tensorboard",
)

trainer = SFTTrainer(
    model=model,
    args=args,
    train_dataset=dataset,
    peft_config=peft_config,
    dataset_text_field="text",
    max_seq_length=max_seq_length,
    tokenizer=tokenizer,
    packing=True
)
- 设置了训练的详细参数,包括训练轮次、批次大小、优化器配置等。
SFTTrainer是一个特别设计的训练器,用于实现参数效率微调(Parameter-Efficient Fine-Tuning),如 LoRA 技术,以及使用BitsAndBytes库进行内存优化。
开始训练并保存模型
trainer.train()
trainer.save_model() - 这里开始模型的训练过程,并在训练完成后保存模型到指定的路径。
清理资源
del model
del trainer
torch.cuda.empty_cache() - 训练完成后,代码清理了占用的内存资源,以确保 GPU 内存得到释放,避免内存泄露。